I love my job! I love working with children! I work in the early morning drop off program (Rooster club), the after school lunch program (Lunch Bunch) and I sub frequently for the teachers. I am not ashamed to admit that I am a big kid at heart which is why this is such a perfect fit for me.
This year there has been one little girl who I frequently "butted heads" with. She has a lot of sass, which is fine by me because I have a lot of sass too, but I got this feeling that she did not like me very much. I cannot tell you how much this has bothered me! I get along with every child that goes to the preschool so I just didn't understand what was going on. I finally resigned myself to the fact that maybe we were never going to have a connection.
On Monday this week I worked the Lunch Bunch shift. We had a very small group and that little girl was there. We have a train table but I have been itching to spread out the track on the floor and see how big we can make it. I proposed the idea and the kids were all for it. So we dumped all the tracks and pieces on the floor and built a nifty train track. The kids had fun with it, especially the little girl. She loved it! It was cute to hear the "conversations" her train was having with the other trains.
It was time for the parents to pick them up but she did not want to leave. She wanted to keep playing with the trains. I promised her that we would built it again when she and I met up again at Lunch Bunch. Even with reassurance she was reluctant to leave. As she and her dad walked out she ran up to the window to see the track again.
The next day:
I did not think much more about the track and trains until I saw her on the playground. I was subbing for the Pre-K class and the class she was in was outside at the same time. She saw me and ran over and gave me a HUGE hug! I could not believe it! I was in shock at first but I saw her beautiful smile beaming at me and I realized that we had finally made that connection.
I cannot tell you how happy that made me and how it taught me that for some it takes time and some wooden train tracks to make that connection.

Wednesday, January 25, 2012
Monday, January 23, 2012
No day is so bad it can't be fixed with a nap.
There we were, 4 p.m. and into our after school ritual. Leah had finished her homework and was in the middle of practicing her violin when a sudden meltdown crept up on us. She was having difficulty with one song and I guess it was enough to break the dam because the tears started falling.
Her frustration grew and she claimed that she never would practice again. She was ready for a play date but I told her that she knew the rules: homework has to be done and violin practiced. Oh Nelly! She did not want to hear that and she proceeded to fall to the floor and cry louder and louder.
Now, I learned long ago that raising my voice does nothing but cause her to get more upset so I kept a calm tone and explained that it was her choice if she had a play date. She knew the rules and time was ticking by. I picked up the broom and started sweeping the kitchen floor. Maybe it was the rhythmic sweeping of the broom or the cracking fire in the fireplace but Leah got quiet. And stayed quiet, which is odd. I peeked over at her in the family room and this is what I saw.......

The child had fallen asleep with her legs propped up and her arms out to the side! I could not believe it! She never naps during the day! I was so amazed I called my friend up the street and she could not believe it either.
Now, here is where my Mom alarm goes off. Was she getting sick? Did she faint from her frustration? Or could it be that she was so exhausted from her day that she just needed a cat nap? Turns out she was tired and all that crying had worn her out to the point that she literally passed out.
She did not sleep very long but it was all her body needed to push through the rest of the day. She swears up and down that she did not fall asleep but I got proof. She giggled when I showed her the picture!
Friday, January 20, 2012
Doing the Coupon Thing
(takes a deep breath) I am going to do the coupon thing again. Just saying that gives me a feeling of being overwhelmed. What is it about couponing that seems impossible? Is it the sight of tiny coupons jammed into an organizer or is it watching Extreme Couponing that makes it seem so daunting?
I did the coupon thing once before but looking back I realized I was doing it all wrong which resulted in me giving up on the whole thing. Here are some things that I learned:


CouponMom is a great site for those wanting to start couponing! Just be warned that if you sign up for the emails you will get bombarded. Some folks might be ok with that but it stressed me out.


That seems simple enough, right? Like I said before I am taking things slow this time. Once I get a good rhythm then I'll venture into other areas of couponing. Who knows maybe you'll see me on Extreme Couponing one day. Ha!
I did the coupon thing once before but looking back I realized I was doing it all wrong which resulted in me giving up on the whole thing. Here are some things that I learned:
- Do not cut all the coupons and put them into a coupon organizer to keep in my purse. I am not doing this again because (1) it made things more confusing and (2) I like my small purse. I do not want to have to buy a bigger one for the sake of toting around coupons that end up expiring before I notice.
- Do not become obsessed with coupons and savings. Ok, that may sound weird, right? The point of using coupons is to save money so why would I not devote a huge chunk of time for it? Simple. I got burned out. I was so into it that I started to resent the time it took to scour the flyers and find the coupons.
- Do not expect gigantic savings right away or all the time. I will save money with coupons but that does not mean I am going to cut my grocery bill in half right away. Nor does it mean I am going to have huge savings every time I buy groceries. Some weeks will be awesome and some weeks will be so so.
- Ok, so instead of clipping the coupons and keeping them in an organizer I am keeping the coupon flyers in a three ring binder. As soon as I get them I punch the holes and put it right in. The oldest on top, the newest at the bottom - this way I can make sure that the ones about to expire get seen first.

- Using the binder also keeps them from just falling apart. I can just flip through easily.

- I write the date that I recieved the flyer at the top. Why do I do this? I use CouponMom to help find the deals at the stores I shop the most. Each item listed will have the flyer name and date so you can easily find the coupon. A time saver!
CouponMom is a great site for those wanting to start couponing! Just be warned that if you sign up for the emails you will get bombarded. Some folks might be ok with that but it stressed me out.

- Now that I'm organized I can go through the store flyers, circle items we use, go to CouponMom and check the stores I shop for their weekly deals and what coupons to use.

That seems simple enough, right? Like I said before I am taking things slow this time. Once I get a good rhythm then I'll venture into other areas of couponing. Who knows maybe you'll see me on Extreme Couponing one day. Ha!
Wednesday, January 11, 2012
Wash. Dry. Fold.
I was looking for an easy way to "decorate" my laundry room (aka laundry closet). There is very little space but I was tired of the same 'blah' look. I decided to have the words Wash Dry Fold up on the walls. Here is what I did to add a bit of personality:
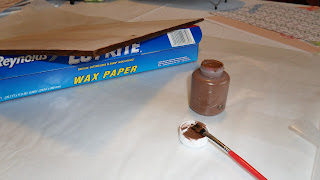
1. I used thick cardboard coasters (I found them at Michael's craft store) to put the letters on.

2. Using my daughter's brown Crayola paint, I painted the sides of the coasters.

3. At Micheal's I found a big pack of while cardboard letters for only $1.99.

4. Using the technique from my other project, click here to see, I picked out scrapbook paper and glued a piece to each square. After they were dried I used my X-acto knife and trimmed the edges. I used Distress Ink on the edges of the paper too.
**To keep the letters flush with each other I cut a strip of thin cardboard and hot glued it to the back of each word. This keeps them from separating.
I glued each letter on with plain Elmer's glue and let that dry.

5. Since the laundry closet tends to get a bit humid at times, I brushed on a coat of Mod Podge. I used the Matte Mod Podge because I did not want a shiny reflection.

6. After the Mod Podge dried I used 3M velcro command strips to mount them on the wall.

Ta da!
Monday, January 9, 2012
Another take on my earlier craft
I love the concept of using 12x12 pieces of thin wood and paring it with scrapbook paper. So easy yet so many options for decorating.
I took that same concept and made a piece for the foyer entrance:


The wood was left over from my dining room project. I found (with help) paper from my stash. I bought the wooden E at Michaels for $3 and painted it.
Easy, peasy.
I took that same concept and made a piece for the foyer entrance:


The wood was left over from my dining room project. I found (with help) paper from my stash. I bought the wooden E at Michaels for $3 and painted it.
Easy, peasy.
Thursday, January 5, 2012
My first DIY wall decoration (idea from Pinterest)
First of all let me say that I am addicted to Pinterest! There are so many fabulous ideas!
Ok, here is my step-by-step process to making these awesome yet very inexpensive wall decor:
1. I went to Lowe's and found a thin piece of board (shelving board) and had them cut it into 12x12 pieces. This was the exact size to get 8 pieces. (I only used 6 for this project)


2. Then I picked out 6 sheets of scrapbooking paper that I wanted to use.

3. I took a piece of sand paper and smoothed all four sides of each square.

4. I then painted the edges of the boards. As you can see I am using some of my daughters Crayola paint so don't think you have to go out and buy expensive paint.
5. After the edges dried I took some watered down glue and then coated the side where the paper would be going. Make sure you have a good coat on there. It helps to prevent air bubbles.


6. After you get your paper on, immediately place a weight on top of it. I used my thick packs of scrapbook paper and random other things that completely covered the surface and pressed it down good.
After 5 minutes you can take the weight off and them let them air dry.
After they were dry I took an X-Acto knife and trimmed off any paper that was over hanging.

7. I used Distress Ink to smudge the edges of the paper. This softens the edges and gives them that cool vintage look.


8. Time to hang them! I used the 3M velcro picture hanging strips so that they would be not completely flush with the wall.


I love the distressed look!

The only two things I paid for was the wood and the distress ink. Only $15 for this entire project!!
Ok, here is my step-by-step process to making these awesome yet very inexpensive wall decor:
1. I went to Lowe's and found a thin piece of board (shelving board) and had them cut it into 12x12 pieces. This was the exact size to get 8 pieces. (I only used 6 for this project)


2. Then I picked out 6 sheets of scrapbooking paper that I wanted to use.

3. I took a piece of sand paper and smoothed all four sides of each square.

4. I then painted the edges of the boards. As you can see I am using some of my daughters Crayola paint so don't think you have to go out and buy expensive paint.

5. After the edges dried I took some watered down glue and then coated the side where the paper would be going. Make sure you have a good coat on there. It helps to prevent air bubbles.


6. After you get your paper on, immediately place a weight on top of it. I used my thick packs of scrapbook paper and random other things that completely covered the surface and pressed it down good.
After 5 minutes you can take the weight off and them let them air dry.
After they were dry I took an X-Acto knife and trimmed off any paper that was over hanging.

7. I used Distress Ink to smudge the edges of the paper. This softens the edges and gives them that cool vintage look.


I love the distressed look!

The only two things I paid for was the wood and the distress ink. Only $15 for this entire project!!
Subscribe to:
Posts (Atom)